My Viking Journey
Creating your account and completing your Guest Information Form, one easy step at a time.
Getting Started
My Viking Journey is Viking's private website for guests who have booked a voyage, where you can see your trip, complete your travel forms, and look at shore excursions.
The first thing Viking asks of every guest is the Guest Information Form. Viking uses it to prepare your reservation, produce your travel documents, and make any flight arrangements in your booking.
Have these ready before you begin
- Your Viking booking number, from the confirmation Viking sent when your trip was booked.
- Your email address, one you can open while you work. Viking will send a short code there.
- Your passport, to copy names and numbers exactly.
- An emergency contact: name and phone number of someone not traveling with you.
Creating Your Account
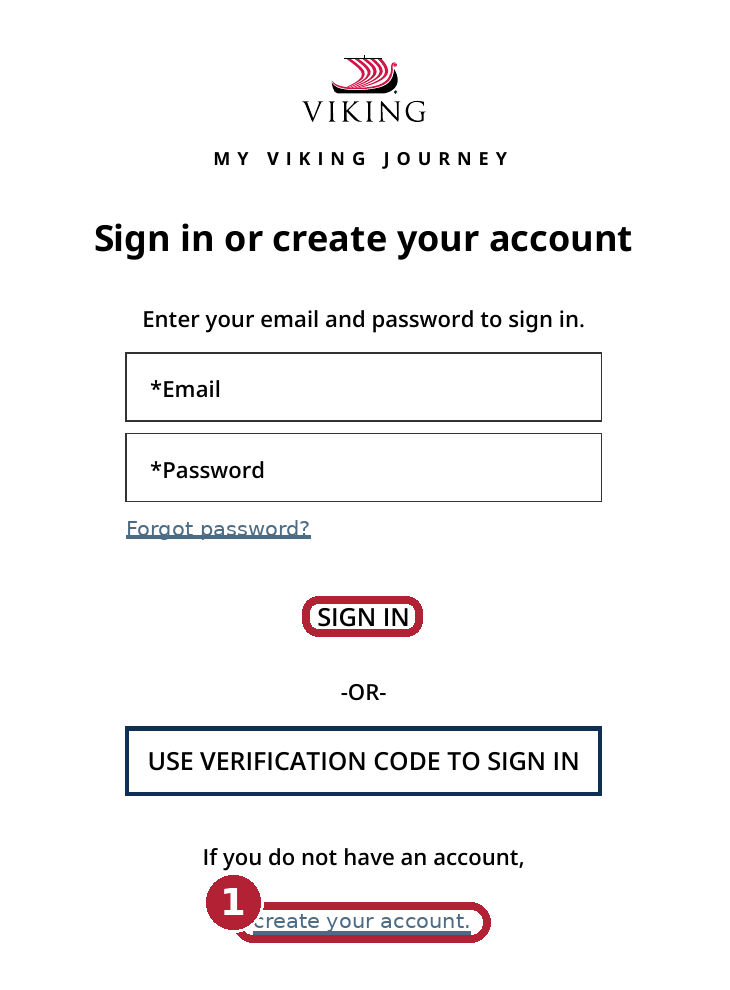
Go to www.myvikingjourney.com (the gold button above takes you there). You will see the sign-in page pictured below. Near the bottom, under the words "If you do not have an account,", tap create your account.
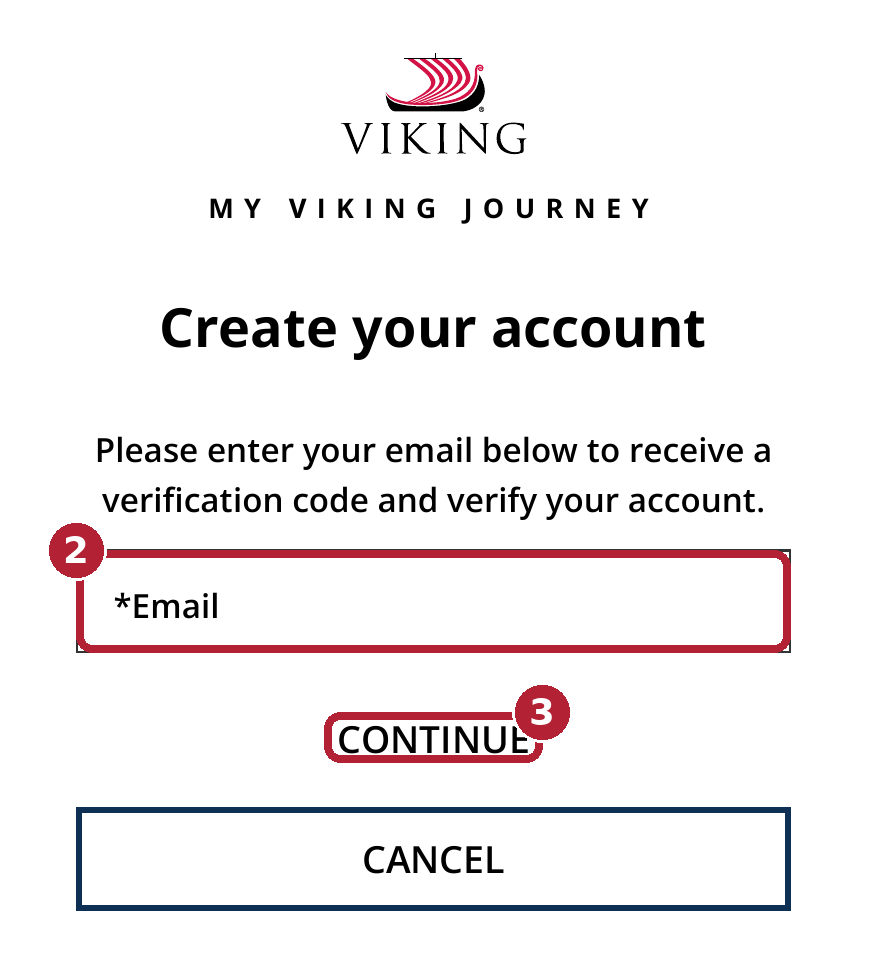
Type your email address in the box marked *Email.
Tap CONTINUE. Viking will send a short verification code to your email.
Open your email, find Viking's message, and type the code on the Viking page when it asks.
Next, Viking asks for your booking number, your last name (exactly as on your reservation and passport), and a password of your choice. Write the password down somewhere safe.
That is it, your account is created. From now on, sign in with your email and password, then tap SIGN IN (outlined in red in the first picture).
Already have an account?
You do not need a new one. Sign in with your email and password, then tap SIGN IN. Forgotten it? Tap Forgot password? and Viking will help you reset it.
On a phone or tablet, the steps are exactly the same. Just look for the same words and buttons.
Finding Your Reservation
After you sign in, your upcoming voyage appears on your account's home page. Tap it to open it. If it does not appear, look for the option to add a booking and enter your booking number and last name. If past voyages appear too, open the one with the correct dates.
Completing the Guest Information Form
This is the most important part of the guide. The pages inside your account show your own voyage, so they look a little different for everyone. Follow the steps below.
Sign in and open your voyage. Look for the section called Guest Documents.
Inside Guest Documents, open the Guest Information Form.
Fill in your information, screen by screen. Take your time: the website saves as you go, so you can leave and come back later.
You will be asked for
- Your full name, exactly as printed in your passport, and your date of birth.
- Your passport details: number, issuing country, and expiry date. Your passport should be valid for at least six months after your trip.
- Your emergency contact: name and phone number of someone not traveling with you.
- Your flight details, if you arranged your own flights.
When your form is complete, look for your traveling companion's name and complete their form too, with their passport and information.
Very important: one form for every traveler
Each person traveling must have their own Guest Information Form completed, even if you share a stateroom. One guest's form does not cover the other. Before you finish, check that every name shows as complete.
When everything is filled in, save or submit the form as the page directs.
How you know it worked: each guest's name shows as complete, and Viking sends a confirmation email. Viking cannot produce your final travel documents until these forms are done, so please complete them soon after booking, and note that My Viking Journey closes 7 days before departure.
Helpful Tips and Troubleshooting
Forgot your password?
Tap Forgot password? on the sign-in page and follow the instructions Viking emails you. Or tap USE VERIFICATION CODE TO SIGN IN to sign in with an emailed code instead.
The verification code did not arrive
Wait a few minutes, check your Spam or Junk folder, and make sure your email address was typed correctly.
Your reservation does not appear
Check the booking number and your last name, spelled exactly as on your Viking confirmation. If it still does not appear, your travel advisor can check the booking for you.
Something will not submit
A required answer is almost always missing. Scroll back slowly; the website marks the spot that needs attention.
You notice a mistake after submitting
Call your travel advisor or Viking right away. Name and passport errors are far easier to fix early than close to departure.
One last check: names must match passports
The name on your form, your reservation, and your airline ticket must match your passport exactly, letter for letter, including middle names as they appear there. A mismatch can cause real problems at the airport, so compare them side by side before you submit.
And if you get stuck at any point, do not worry. That is what your travel advisor is for.
Screens shown are from www.myvikingjourney.com, verified November 2026; Viking may update its website, so yours may differ slightly. This guide is not published by Viking Cruises.